DIFFICULT AIRWAY

Proud to be an Anesthesiologist
DIFFICULT AIRWAY
Difficult Airway Society (DAS) Guidelines
Figure 1.14 summarizes the simple algorithm put forward by Difficult Airway Society (DAS).

Unanticipated difficult tracheal Intubation— during routine induction of anesthesia in an adult Patient
At preoperative evaluation the anesthetist has decided that tracheal intubation is the correct way of protecting/ maintaining the airway, and has not predicted any significant problems with either direct laryngoscopy or
mask ventilation. There is no increased risk of aspiration of gastroesophageal contents.
Airway evaluation is not perfect and problems may arise even if the patient is evaluated as not presenting airway difficulties. Strategy must cope with unexpected difficult direct laryngoscopy.
DAS suggests that this guideline represents the default strategy for intubation when this is not predicted to be difficult. The strategy deals with unexpected failed direct laryngoscopy (Fig. 1.15). The patient is anesthetised, paralysed (usually with nondepolarizing relaxants) and intubation is attempted by direct laryngoscopy.
Plan A
This is the planned first method of intubation by direct laryngoscopy. Intubation is attempted by optimal direct laryngoscopy and this has 5 components:
-
Optimal head and neck positioning
-
Optimal muscle relaxation
-
Optimal laryngoscope blade
-
Optimal external laryngeal manipulation
-
Optimal use of the bougie.
A number of intubation attempts may be undertaken-to change the blade (long, straight McCoy etc), to use the bougie or to apply optimal external laryngeal manipulation. After 3–4 attempts at intubation, it is likely that the practitioner is repeating fruitless attempts and no further attempts should be made.
Correct positioning of the tube in the trachea (rather than esophagus) should always be verified after intubation preferably by two out of the 3 best techniques of visual confirmation of the tube passing through the glottic aperture, six consecutive normal capnograph traces and reinflation of the esophageal detector device.
It is a deliberate act to stop attempts at direct laryngoscopy, announcing to your assistant ‘Failed direct laryngoscopy’. This stops you having yet another attempt and alerts your assistant that you will be going on to Plan B. Start facemask ventilation and ask for a laryngeal mask. Ask for assistance. Go to Plan B.
Plan B
Plan B is initiated by ventilation of the patient initially by face mask and then by laryngeal mask. The laryngeal mask is particularly important and is the link between Plan A and Plan B. The priority is oxygenation and stabilizing the patient-not intubation.
If ventilation is not possible by face mask or laryngeal mask go to Plan C.
The importance of the laryngeal mask is that it generally allows:
-
Good ventilation
-
Attachment to the breathing system
-
Attachment of monitoring to display end—Tidal volatile
-
agent, oxygen and carbon dioxide levels
-
Provides a route for intubation.
Both the classic and intubating laryngeal masks are suitable, although initially the classic will be available in all places and will be most familiar.
Whilst Plan B involves the alternative method of intubation, it starts by addressing 5 important checks; ÂÂCheck that the patient is oxygenated
-
Check that the patient is anesthetised
-
Check that the patient is properly paralysed
-
Check that the cardiovascular system is stable
-
Check that the CO2 is at a reasonable level
Once the patient has been stabilized and oxygenated, the secondary intubation attempt is attempted. This is intubation through the ILMA or classic LMA. DAS recognises that blind intubation through the ILMA has a high success rate, but promotes a visual fiberoptic technique through the ILMA or classic LMA (according to preference of the anesthetist).
If intubation is successful, the position of the tube in the trachea is confirmed by capnography (and if wished by the oesophageal detector device as well) and surgery continues.
If intubation by the secondary technique fails, or ventilation by the LMA is not possible—Go to Plan C. If the LMA or ILMA has been tried unsuccessfully for intubation (i.e. it has been used to ventilate the patient in Plan B but intubation has not been successful) leave the device in situ, keep the patient anesthetized and ventilated and allow
the patient to wake up when muscle relaxation can be antagonized. Surgery is to be postponed and rescheduled. Awake intubation should be considered.
If at the initiation of Plan B, ventilation by laryngeal mask has not been possible (or not very satisfactory) then Plan B is bypassed to plan C. Remove the laryngeal mask if there is unsatisfactory ventilation through it and return to facemask ventilation with a large oral airway. Consider using both hands to hold the face mask with another set of hands squeezing the bag. If this fails, consider 4-handed mask ventilation in which four hands are used to apply the face mask and open the airway by jaw thrust and neck extension, with another pair of hands squeezing the bag.
If it is not possible to maintain oxygen saturations above 90% with 100% oxygen and face mask ventilation, this is a situation of Failed Ventilation and Failed Intubation and Plan D is adopted.
Plan D is covered in another guideline.

Failed intubation, increasing hypoxemia and difficult ventilation in the paralysed anesthetised patient
The scenario is of a patient under general anesthesia with muscle relaxation who cannot be intubated by direct laryngoscopy and in whom mask ventilation is difficult/ impossible (Fig. 1.16).
-
Do not waste time trying to intubate when oxygenation is the priority.
-
Consider whether laryngospasm is the problem (treat this initially with further IV anesthesia increments).
-
A large oral airway and four hands holding the face mask/ applying jaw thrust and neck extension with another person squeezing the bag might be defined as optimal face mask inflation. If it fails, go onto the next step.
-
Place a classic laryngeal mask-an excellent life-saving device. Some suggest that it is more sensible to place this than struggle with difficult face mask ventilation. If it fails to provide an airway leave it in situ, to provide route for egress of air if needle cricothyrotomy needed.
-
It is possible that, if suxamethonium is used, its rapid offset will allow the patient to ‘wake-up’ and regain their own airway before serious hypoxia ensues. However, there is no guarantee of this.
-
With failed intubation, failed face mask and failed laryngeal mask ventilation (CVCI can’t-ventilate-can’t- intubate, or CICO can’t-intubate-can’t-oxygenate) carry on now to emergency cricothyrotomy to provide emergency oxygenation with prepared kit.

Awake Airway Management
The advantages of awake intubation attempt as compared to anesthetic state include:
-
Maintenance of spontaneous ventilation in the event that the airway cannot be secured rapidly
-
Increased size and patency of the pharynx
-
Relative forward placement of the base of the tongue
-
Posterior placement of the larynx
-
Patency of the retropalatal space
-
Awake state confers some maintenance of upper and lower esophageal sphincter tone, thus reducing the risk of reflux
-
Patients at risk for neurologic sequelae (e.g.,patients with unstable cervical spine pathology) may undergo active sensory-motor testing immediately after tracheal intubation.
In an emergent situation, there may be cautions (e.g.cardiovascular stimulation in the presence of cardiac ischemia or ischemic risk, bronchospasm, increased intraocular pressure, increased intracranial pressure) but no absolute contraindications to awake intubation. Contraindications to elective awake intubation include patient refusal or inability to cooperate (e.g. child, profound mental retardation, dementia, intoxication) or allergy to local anesthetics.
Once the anesthesiologist has decided to proceed with awake airway management, the patient must be prepared both physically and psychologically. Most patients will appreciate an explanation of the need for an awake airway examination and will be more cooperative once they realize the importance of, and rationale for, any uncomfortable procedures. Patients understand safety and the discussion should emphasize the anesthesiologist’s concerns. Once the airway has been prepared, patients will realize that they should experience no further discomfort during the intubation.
Pharmacological premedication options to be considered are:
-
Anxiolytics
-
Sedatives
-
Antisialogogues
-
Aspiration prophylaxis.
If sedatives are to be used, the clinician must keep in mind that producing obstruction or apnea in the difficult airway patient can be devastating and an overly sedated patient may not be able to protect the airway from regurgitated gastric contents, or cooperate with procedures. Although almost any sedative agent can be used, some rules should apply to all: judicious dosing in small amounts, avoid polypharmacy (try to use no more than two agents), and have reversal agents like flumazenil (benzodiazepines), naloxone or naltrexone (opioids) at hand.
Administration of antisialogogues is important to the success of awake intubation techniques. The commonly used drugs are atropine (0.5 to 1 mg intramuscularly or intravenously) and glycopyrrolate (0.2 to 0.4 mg intramuscularly or intravenously). The clinician must wait until the patient subjectively reports the drying activity of the injected antisialogogue.
The key purposes served by antisialogogues are:
-
Clearing of airway secretions: essential to the use of indirect optical instruments (e.g. flexible or rigid fiberoptic laryngoscope, video laryngoscope) because small amounts of any liquid can obscure the objective lens.
-
Increase the effectiveness of topically applied local anesthetics: By reducing saliva production, these drugs remove a barrier to mucosal contact.
-
Another advantage is reducing drug dilution. Vasoconstriction of the nasal passages is required if there is to be instrumentation of this part of the airway.
Oxymetazoline is a potent and long-lasting vasoconstrictor. If the patient is at risk for gastric regurgitation and
aspiration, prophylactic measures should be undertaken. It is also prudent to supply supplemental oxygen to the patient by nasal cannula (which can be placed over the nose or mouth).
Local anesthetics are a cornerstone of awake airway control techniques. The airway, from the base of the tongue to the bronchi, comprises an undeniably sensitive series of structures. Topical anesthesia and injected nerve block techniques have been developed to blunt the protective airway reflexes as well as to provide analgesia.
There are three anatomic areas to which the clinician directs local anesthetic therapy:
The nasal cavity nasopharynx, the pharynx/base of tongue, and the hypopharynx/larynx/trachea.
The sensory nerve supply of the airway is shown in Figure 1.17. .
I. Anesthesia of the Nasal Mucosa and Nasopharynx Drugs:
4% Lidocaine with epinephrine (or cocaine is a 4% solution—Max. 200 mg in adult), or mixture of Lidocaine 3% and Phenylephrine 0.25%.
-
Patient Position: Patient is most comfortable when head of bed is elevated approximately 30 ̊.
-
Technique: *Application of long cotton-tipped applicators or wide cotton pledgets soaked in the local solution (lidocaine and cocaine or phenylephrine) are applied over the nasal mucosa by inserting applicators into both nares in the following manner:
– One applicator is placed along the inferior turbinate
to the posterior nasopharyngeal wall
– A second applicator is placed in a cephalad angulation along the middle turbinate, back to the mucosa covering the sphenoid bone (most important as it is the one most likely to anesthetize branches of the sphenopalatine ganglia as they pass along the lateral wall of the airway) (Fig. 1.18).
– A third applicator may be placed along the superior turbinate, resting against the cribriform plate and posterior nasopharyngeal wall, providing anesthesia to the anterior ethmoid nerve.
– The applicators are then left in place for 5 minutes, and the pledgets for 2–3 minutes. (The use of wide cotton pledgets placed into the same areas with alligator forceps provides maximal topical anesthesia and vasoconstriction of the nasal mucosa).


Additionally, *nasal airways, in increasing sizes, can be lubricated with Lidocaine 2–5% jelly, and passed into the nostril being intubated for additional patient comfort. [*These procedures allow for blocking of the spheno- palatine (or Meckel’s ganglion) and the ethmoid nerve]. They should be done bilaterally provide posterior pharyngeal anesthesia, caudad to this level.
Complications: Epistaxis can occur due to trauma to nasal mucosa. Also, systemic toxicity can occur, thus doses of anesthetic delivered to the patient should be monitored to prevent exceeding the maximum dosages. Loss of protective laryngeal reflexes may place patient at increased risk for aspiration.
II. Anesthesia of the Mouth and Oropharynx
Drugs: Lidocaine spray 10%, Lidocaine gel 2–4%, Viscous lidocaine 2%, Lidocaine 4% solution.
Patient position: Supine.
Techniques
-
Non-invasive: 4cc of 4% Lidocaine or 0.5% Tetracaine can be placed in a nebulizer. The patient then inhales the nebulized local anesthetic for 30–40min, or the tongue and posterior pharynx are sprayed with the atomizer. Viscous lidocaine 2–4 ml may also be used as a gargle (swish and swallow).
-
Invasive: Glossopharyngeal Nerve Block is performed when topical techniques are not completely effective in obliterating the gag reflex.
This block can be performed after the mouth and oropharynx are adequately anesthetized. Branches of this nerve are most easily accessed as they transverse the palatoglossal folds. This is performed with the anesthetist standing contralateral to the side to be blocked and the patient’s mouth wide open. The palatopharyngeal fold (posterior tonsillar pillar) is identified and a tongue blade, held with the non-dominant hand, is introduced into the mouth to displace the tongue medially (contralateral side) creating a gutter between the tongue and the teeth. A 25G spinal needle is inserted into the membrane near the floor of the mouth at the base of the culdesac (Fig. 1.19) and advanced slightly (0.25–0.5 cm). An aspiration test is performed. If air is aspirated, the needle has passed through the membrane (through and through). If blood is aspirated, the needle is redirected more medially. Then, 2 ml of 1% Lidocaine can be injected into the anterior tonsillar pillar 0.5 cm lateral to the base of the tongue (this most readily blocks the lingual branch). This block has been reported as painful, and may result in a persistent hematoma. Palatoglossal arch, is a soft tissue fold, continuing from posterior edge of the soft palate to the base of tongue.
A posterior approach (*often used for tonsillectomy), may be difficult, in visualizing the site for needle insertion, which is behind the palatopharyngeal arch (where the nerve is in close proximity to the carotid artery). There is risk for arterial injection and bleeding, and the technique is usually reserved for otolaryngologists. Steps for this procedure can be found in other sources and are not cited here.

III. Superior Laryngeal Nerve (SLN) Block
Drugs: 2–4 ml of Lidocaine 1% or 2% lidocaine, with or without epinephrine.
Patient position: Supine, with head slightly extended.
Technique: Anesthetist is positioned on the ipsilateral side of the neck. The cornu of the hyoid bone is palpated transversally with the thumb and the index finger on the side of the neck immediately beneath the angle of the mandible and anterior to the carotid artery. To facilitate its identification, the hyoid bone is displaced toward the side being blocked. One hand displaces the carotid artery laterally and posteriorly. With the other hand, a 22 or 23 gauge—25 mm needle is “walked off” the cornu (cartilage) of the hyoid bone in an anterior caudad direction, aiming in the direction of the thyroid ligament, until it can be passed through the ligament. At a depth of 1–2 cm, 2 ml of 2% lidocaine with epinephrine is injected (after negative air and blood aspiration) into the space between the thyrohyoid membrane and the pharyngeal mucosa. An additional 1 ml is injected as needle is withdrawn. The block is repeated on the other side (Fig. 1.20).
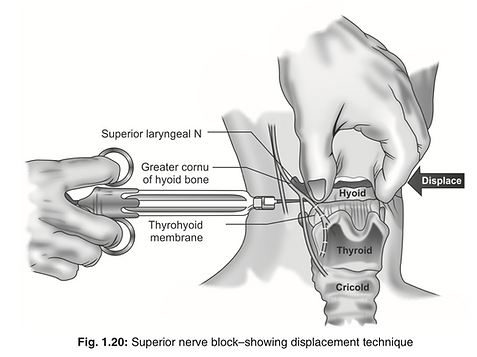
Exercise caution - not to insert the needle into the thyroid cartilage, since injection of local anesthetic at the level of vocal cords may cause edema and airway obstruction. If air is aspirated, laryngeal mucosa has been pierced, and the needle needs to be retrieved. If blood is aspirated (superior laryngeal artery or vein), the needle needs to be redirected more anteriorly. Pressure should be applied to avoid hematoma formation.
Complications
(i) Systemic toxicity—can occur quickly when several different techniques are used. Topical anesthetics enter the circulation more quickly than when injected into tissues, and can be absorbed in the respiratory and GI tracts.
(ii) Hematoma formation—from puncture during needle placement for injection or vascular structure damage. Maintain pressure long enough to prevent hematoma or continued bleeding.
IV. Recurrent Laryngeal Nerve Block – (Transtracheal or Translaryngeal Block)
Drugs: Most often, 3–4 ml of Lidocaine 4 % is used.
Also, 1% or 2% lidocaine, with or without epinephrine. Translaryngeal injection of local anesthetic provides topical anesthesia for both vagal branches (SLN and RLN) since injection below the cords, through the cricothyroid membrane, and results in the solution being spread onto the tracheal (RLN) structures, and coughed onto the more (SLN) structures.
Patient position: Supine, with neck hyperextended (or pillow removed and extended).
Technique: Inform the patient about the procedure, what is expected of him, and likelihood of coughing. Anesthetist should be in position to place index and third fingers of the nondominant hand in the space between the thyroid and cricoid cartilages (identifying the cricothyroid membrane). The trachea can be held in place by placing the thumb and third finger on either side of the thyroid cartilage. The midline should then be identified and injected lightly to create a local skin wheal (using a 22 guage or smaller needle). A 10 ml syringe containing 4% lidocaine (or other desired concentration), is mounted on a 22 guage, 35 mm plastic catheter over a needle, and is introduced into the trachea. The catheter is advanced into the lumen, midline through the cricothyroid membrane, at an angle of 45°, in a caudal direction. Immediately, after the introduction of the catheter into the trachea, a loss of airway resistance and aspiration of air confirms placement, and the needle is removed from the catheter. The patient is then asked to take a deep breath and then asked to exhale forcefully. At the end of the expiratory effort, 3–4 ml of local anesthetic solution is rapidly injected into and over the back of the trachea. This will usually cause patient to first inhale to catch his or her breath and then forcefully cough, spreading the lidocaine over the trachea, making distal airway anesthesia more predictable This area is nearly devoid of major vascular structures.
The catheter may be left in place until the intubation is completed for the purpose of injecting more local anesthetic, if necessary, and to decrease the likelihood of subcutaneous emphysema.
Complications
(i) Gastric aspiration—This technique is possibly contraindicated in patients with high risk of gastric aspiration, but is believed by most authorities to actually decrease the risk, by decreasing risk of coughing and gag reflex during intubation.
(ii) Risk of coughing—This block usually rapidly results in a fit of coughing, which should be considered in patients whom coughing is undesirable or contraindicated. This block is contraindicated in patients diagnozed with an unstable neck, because it induces coughing. During performance of the block, the patient should not talk, or swallow, if possible.
(iii) Vascular injury—The needle does not need to be far off the midline of the cricothyroid membrane to encounter significant arterial and venous vessels.
(iv) Structural injuries—Surrounding structures, including the posterior tracheal wall and vocal cords can be damaged, especially if the needle is not stabilized during injection of the local anesthetic, or not removed immediately!
(v) Intravascular injection—Aspiration should be performed prior to the injection of local anesthetic.
(vi) Systemic toxicity—It can occur quickly when several different techniques are used.
Note: It is a good practice to estimate the toxic dose of local anesthetics for a given patient and draw the local anesthetic from this quota for various airway blocks. One should be prepared to recognise and manage local anesthetic toxicity at any point of time. Thorough planning is the key to success in airway management.
Fibre-Optic Intubation
The value of the fiberoptic bronchoscope (FOB) in difficult endotracheal intubation is well-established. However, the use of FOB should not be limited to patients in whom endotracheal intubation may be difficult (Table 1.10). Many patients who might be denied general anesthesia or might receive tracheostomy can be safely intubated with the help of the FOB. Fiberoptic intubation is accomplished simply, quickly, and easily when certain preparatory steps are taken.

A. Preparation of equipment
1. Fiberoptic bronchoscope and cart: Anesthesiologists must be prepared to manage any kind of airway at any time. All equipment and supplies for administration of anesthesia, resuscitation, and monitoring should be available in the operating room and should be checked following a standard protocol before beginning a nonemergent fiberoptic intubation. The cart should be equipped with FOBs, a light source, drugs for application of topical anesthesia, and various other airway supplies such as gauzes, tongue blades, intubating and nasal airways, cotton-tipped swabs, bronchoscopy swivel adapter, lubricant (K-Y jelly or silicone lubricant), and endoscopy masks, which may be needed for fiberoptic intubation. Integration of this cart with a difficult cart is reasonable as the FOB is one of the first-line tools to approach the patient with a difficult airway. Adequate suction should be available and ready for use. Various intubating airway devices, nasopharyngeal airways, endoscopy masks, and bronchoscopy swivel adapters have been used to facilitate fiberoptic ET intubation.
The fiberoptic bronchoscope is a fragile device with optical and nonoptical elements. The fundamental element consists of a glass fiber bundle. Each fiber is 8 to 12 microns in diameter, and is coated with a secondary glass layer termed the cladding. The cladding aids in maintaining the image within each fiber as the light is reflected off the sidewall at a rate of 10,000 times per meter as it moves from the objective lens to the eyepiece lens in the operator’s handle. The typical intubating fiberoptic bronchoscope has 10,000 to 30,000 such fibers encased in a 60 cm, water impermeable insertion cord, with gradation marks every 10 cm. Although the fibers are allowed to rotate over each other throughout the length of the cord, they are fused together at the two ends in a coherent pattern that is, the arrangement of the fibers at the eyepiece end is identical to the arrangement at the objective lens, where a diopter ring allows focusing. Therefore, one might envision that the image before the objective lens (i.e. the objective) is divided into 10,000 individual and unique pictures, which independently travel down an unwieldy cord to be reassembled in front of the eyepiece lens.
The insertion cord also contains an accessory lumen (working channel): A lumen, up to 2 mm in diameter, which travels from the distal tip to the handle. It can be used for applying suction, or oxygen, and instilling lavaging fluids or drugs (e.g. local anesthetics). In general, fiberoptic bronchoscopes that are <2 mm in external diameter (e.g. pediatric) do not have a working channel.
Two wires traveling from a lever in the handle down the length of the insertion cord control movement of the distal tip in the sagittal plane. The entire insertion cord is protected by a metal “wrap” until the level of the distal tip, which is hinged for movement. Coronal plane movement is accomplished by a combined use of the control lever and rotation of the entire fiberoptic bronchoscope from handle to distal end. Because the fibers are able to move over one another, except for where they are fused at the extreme ends of the optic cord, rotational control is maximized by reducing any curves in the fiberoptic bronchoscope shaft.
The final element of the fiberoptic bronchoscope is the light source. Illumination of the objective is provided by one or two noncoherent bundles of glass fibers that transmit light from the handle to the distal tip. The light is provided either by a “universal” cord that emerges from the handle and is inserted into a medical-grade endoscopic light source, or may be provided by a battery-operated light source on the handle.
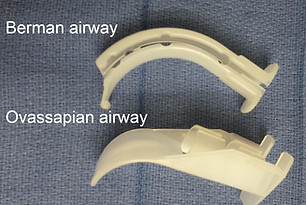
2. Intubating airways for fiberscope aided intubation
i. The Berman II intubating airway: Disposable; tubular along its entire length, has a longitudinal opening on its side, which can be opened wide to disengage it from the endotacheal tube (ET) and remove it from the patient’s mouth.
ii. The Ovassapian fiberoptic intubating airway: The airway has a flat lingual surface on the proximal half, which minimizes its movement. The wide distal half of the airway curves to prevent the tongue and soft tissues of the anterior pharyngeal wall from falling back and obstructing the view of the glottis. This airway is available in only one size and accommodates an ET upto 8.5 mm in inner diameter (ID).
iii. The Patil fiberoptic airway: A groove at the middle portion of the distal part of the airway provides room for anterior-posterior maneuvering of the FOB. However, an ET does not pass through the airway, and it should be removed before advancement of the ET. It is available in only one size and is made of aluminum.
iv. The Williams airway intubator: The proximal half is cylindrical; the distal half has an open lingual surface. The airway is made in two sizes, 90 and 100 mm, which admit ETs upto 8 and 8.5 mm ID, respectively. Because of its design, the tip of the FOB cannot be maneuvered in an anteroposterior or a lateral direction. If the distal end of the airway is not in line with the glottic opening, the exposure of the cords becomes difficult, necessitating partial withdrawal of the airway. The ET adapter should be removed before intubation to allow removal of the airway.


B. Preparation of the patient
a. Psychological preparation: Informative, reassuring preoperative visit
b. Pharmacologic preparation premedication: No or light sedation for calm patients, heavy sedation for anxious patients, narcotics when pain is present. Antisialogogue unless contraindicated.
c. Intravenous sedation: Usually conscious sedation would be sufficient, judicious approach by the anesthesiologist
d. Topical anesthesia: Oral intubation—oropharynx, laryngotracheal; Nasal intubation— nasal mucosa, laryngotracheal
C. Monitoring and Oxygen Supplementation
D. The Technique
The procedure can be done either standing at the head end facing the patient’s feet or standing on the side facing the patients face. Stand tall to avoid bending the main cord that may damage fiberoptic bundles. The following will describe the conduct of the procedure from the head end. The assistant is instructed regarding the application of jaw thrust or head extension if required. The insertion shaft is lubricated with a water soluble lubricant and it is threaded through the lumen of an ETT, the objective end emerging from the main ETT orifice. A clinically appropriate ETT should be chosen, but the larger the ratio between the internal diameter of the ETT and the external diameter of the insertion shaft, the greater the risk of “hang-up” on airway structures. The orientation of the tracheal tube bevel is important in this regard. In orotracheal intubation, the bevel cleft is likely to entrap the right arytenoid cartilage when the ETT is in its typical concavity anterior position. Rotation of the ETT counterclockwise 90° places the bevel facing posteriorly and improves passage. During nasotracheal intubation, the epiglottis may be entrapped, and a bevel- up position (rotation of the ETT 90° clockwise) may facilitate passage.
Oral approach:
An intubating airway like the Ovassapian airway or a mouth guard is inserted to protect the main cord from being damaged by the patient’s teeth. The lubricated scope is inserted down the airway using the right hand. The right thumb, index and middle fingers hold the distal end of the scope for insertion while the little finger rests on the patient’s face for stability. The uvula is visualized and the scope is maneuvered beneath it. Once beyond the uvula, angulate the tip anteriorly by pushing the lever down and advance until the epiglottis comes into view. This sharp angulation at the uvula makes the oral FOB difficult as compared to the nasal approach where a gentle curve is encountered.
Nasal approach:
The tip of the nose is elevated and the scope is introduced through the more patent nostril. It is inserted along the inferior turbinate. Stay in the center of the lumen and avoid scraping the mucosa that may precipitate bleeding. After entering the nasopharynx gently angulate the scope anteriorly and advance to visualize the epiglottis.
Approach after epiglottis visualization:
Advance the scope below the epiglottis to visualize the glottic opening. If passage beneath the epiglottis is difficult ask the assistant to extend the head of the patient or execute jaw thrust. Keep the vocal cords in the center of the field by up-down angulation or clockwise, counter clockwise rotation of the scope. If anatomy is lost at any stage, withdraw the scope until the anatomy becomes identifiable again. When withdrawing the scope, remove finger from the lever that controls the tip.
The scope commonly impinges at the anterior commissure or the anterior laryngeal wall. Angulate posteriorly while advancing between the cords to enter the trachea. The trachea is recognized by the c-shaped cartilages anteriorly (12 O’clock position). Keep the tracheal opening in the center of the field and advance the scope until the carina comes into the view. Once the larynx is entered, the operator may choose a structure, such as the tracheal carina, to serve as an identifying landmark as the ETT is advanced.
Common reasons for failure during fiberoptic aided intubation include:
-
Lack of experience: Not practicing on routine intubations ÂÂFailure to adequately dry the airway: Under-dose or rushed technique
-
Failure to adequately anesthetize the airway of the awake patient: Secretions not dried, rushed technique
-
Nasal cavity bleeding: Inadequate vasoconstriction; rushed technique, forcible ETT insertion
-
Obstructing base of tongue or epiglottis: Poor choice of intubating airway, require chin lift/jaw thrust ÂÂInadequate sedation of the awake patient
-
Hang-up: ETT too large
-
Fogging of the FOB: Suction or oxygen not attached to working channel, cold bronchoscope.
The contraindications to Fiberoptic bronchoscopy include:
-
Hypoxia
-
Heavy airway secretions not relieved with suction or antisialogogues
-
Bleeding from the upper or lower airway not relieved with suction
-
Local anesthetic allergy (for awake attempts) ÂÂInability to cooperate (for awake attempts).
Blind-nasal Intubation
The first blind nasal intubation was performed by Rowbotham. In the absence of fiberoptic bronchoscope, specific indications for blind nasal intubation (BNI) are:
a. When the patient cannot open his mouth adequately enough to allow laryngoscopy to be performed; and
b. When mouth opening is adequate but still laryngoscopy is either impossible or if possible does not leave any further space to introduce the endotracheal tube, e.g.in presence of an intraoral mass.
This procedure may be performed in an awake patient with conscious sedation and local anesthesia to the airway or in an anesthetized patient breathing spontaneously. The head is positioned as for direct laryngoscopic intubation (Magill position or sniffing position) and a softened, well lubricated endotracheal tube (typically 6.5–7.5 mm in adults) is gently passed through the nostril of choice until it reaches the pharynx. Then, the chin is lifted forwards and the other nostril is occluded. If the patient is awake he is asked to close his mouth and breathe deeply. Alternatively, in an anesthetised patient, the tube is advanced slowly while listening for breath sounds at the end of the tube. Capnography is extremely useful in this situation. Breath sounds or a capnography trace indicate that the tube has passed into the trachea. Blind nasal intubation is a very useful technique because it does not need expensive equipment and can be performed anywhere.
The “Eye-openers” in Blind Nasal Intubation
-
Tube manipulation: Rotation of the tube at its machine end from side to side allows the patient end to move not only from side to side but in an arc that takes it posteriorly (when moving away from midline) and anteriorly (when moving towards the midline) as well.
-
Head and neck manipulation: During BNI flexion of the head and neck of the patient makes the tip of the tube to move posteriorly and extension makes it move anteriorly. The rotation of the head to one side makes the laryngeal inlet to move to the same side. Position of the laryngeal inlet can also be altered either by pressing over the thyroid cartilage or by lifting and shifting it using the nondominant hand while manipulating the tube with the other.
-
Neck bulges: If the bulge is seen above the hyoid bone, it indicates that the tube is in the area of vallecula and is yet to negotiate the epiglottis. If the bulge is observed at the level of the thyroid notch, the tube is stuck anteriorly either in the area of thyroepiglottic ligament or just below the vocal cords in the anterior wall of the larynx. It the tube tip enters the pyriform fossa, it appears as a swelling either to the left or right of midline lateral to thyroid cartilage. If no bulge is seen in the neck during BNI, the tube is either in the trachea or the esophagus.
Retrograde-wire Intubation
Retrograde wire intubation (RWI) involves the antegrade pulling or guiding of an ETT into the trachea using a wire that has been passed into the trachea via a percutaneous puncture through the cricothyroid membrane or the cricotracheal membrane, and blindly passed retrograde into the larynx, hypopharynx, pharynx, and out of the mouth or nose. The most common indications are inability to visualize the vocal folds owing to blood, secretions, or anatomic variations, unstable cervical spine, upper airway malignancy, and mandibular fracture. Contraindications include lack of access to the cricothyroid membrane or the cricotracheal ligament (because of severe neck deformity, obesity, mass), laryngotracheal disease (stenosis, malignancy, infection), coagulopathy, and skin infection.
The equipments required for retrograde wire intubation (RWI) include:
-
18 gauge or larger angiocatheter
-
Luer lock syringe, 3 ml or larger
-
Guide wire: Preferably J-type end; Length: At least 2.5 times the length of a standard ETT (typically 110–120 cm); Diameter: Capable of passing, via. angiocatheter being chosen
-
Other: Scalpel blade, nerve hook, Magill forceps, 30 inch silk suture, epidural catheter
In general, topical anesthesia of the trachea, larynx, pharynx and nasal passages is desirable. Local anesthesia of the airway should be administered to prevent discomfort and to blunt airway reflexes as time permits. Translaryngeal anesthesia is a particularly convenient technique because a percutaneous entry of the trachea is required during the RWI. Structures above and below the vocal folds are anesthetized during the ensuing patient cough if a local anesthetic filled syringe is used to facilitate the recognition of appropriate needle placement (with tracheal air bubbles) and then is injected to provide airway anesthesia. RWI is generally performed with the patient in a supine position, although the sitting position is often used for patients in respiratory distress. Extension of the head or the neck displaces the cricoid and tracheal cartilages anteriorly and moves the sternocleidomastoid muscles laterally. The skin should be prepared. If the patient is conscious, a local anesthetic skin wheel is made over the puncture site.
As noted earlier, the cricothyroid membrane and cricotracheal ligament are both potential sites for translaryngeal puncture. Although the cricothyroid membrane has the advantage of being directly anterior to the large posterior surface of the cricoid cartilage, thereby protecting the esophagus from a puncturing needle, it places the needle in close proximity (0.9 to 1.5 cm) to the vocal folds, and hence allows for a somewhat smaller margin of error at the time of the intubation.
An atraumatic “J” guidewire is the commonly employed retrograde device. These guidewires are typically 0.032 to 0.038 inches in diameter, being able to pass though an 18 gauge intravenous catheter. The typical length is between 110 and 120 cm. The only requirement for length is that the wire be more than twice as long as the tracheal tube to be used. Kits are available that conveniently incorporate all the necessary equipment.
The needle/catheter approaches the trachea at 90 degrees to the coronal and sagittal planes if possible. In this orientation, the needle is likely to impact the posterior aspect of the cricoid cartilage if advanced too far, and not puncture the esophagus. Additionally, this angle will help to avoid trauma to the near-lying vocal folds. After the percutaneous puncture is made and the trachea identified by free air aspiration, the catheter is angled cephalad and the wire is advanced (J-tip) into the trachea until it emerges from the mouth or nose. The wire may need to be retrieved from the mouth with a “sweeping” finger, Magill forceps, or nerve hook. Any obstruction to advancement of the wire should prompt re-evaluation of the angle of the catheter and the position of the head and neck (e.g., catheter directed posterior and/or caudad, neck flexed). Coughing typically heralds a caudad traveling of the wire. If the wire is retracted and found to be bent, it is prudent to procure a new one. When complaints of pain are encountered above the level of the larynx, it is typically because of the wire passing into an inadequately prepared nasal cavity. Options include retracting the wire modestly and asking the patient to open the mouth and maximally protrude the tongue during the readvancement, reaching into the oropharynx to retrieve the wire, or patiently repreparing the nasal passages. Once the wire is satisfactorily retrieved, placement of the tracheal tube may be performed using the wire in a number of fashions using rail-roading technique.
Approach to extubation of Difficult airway
The patient who presented as having a difficult airway at the time of anesthetic induction must be considered as having a difficult airway at the time of extubation, even when corrective surgery was performed in the interim (e.g. uvulopalatoplasty in the obstructive sleep apnea patient).
When there is a suspicion that a patient may have difficulty with oxygenation or ventilation after tracheal extubation, the clinician may choose from a number of management strategies. These may range from the preparation of standby reintubation equipment to the active establishment of a bridge or guide for reintubation and/ or oxygenation. When the patient’s intubation is without difficulty and there is no substantial reason to believe that an interim insult to the airway has occurred, extubation may be accomplished in a routine fashion, with a heightened state of readiness for reintubation. When there has been difficulty with intubation or there is a clinical suspicion that reintubation will be difficult, extubation over a guiding stylet may be a successful technique.
A popular test used to predict post extubation airway competency is the detection of a leak on deflation of the ETT cuff.
A fiberoptic bronchoscope may be used to view the tracheal structures during the removal of the ETT. If extubation is tolerated, the fiberoptic bronchoscope can be slowly withdrawn into the subglottic region. If secretions do not obstruct the objective lens, the vocal folds and other structures may be visualized and evaluated.
A number of obturators are available for use in trial extubation (where they may be left in place in the airway for extended periods) or ETT exchange (e.g. failure of the ETT cuff).